Wednesday, December 19, 2012

Size Does Matter

We're hosting Christmas Eve at our house and my husband thinks our island countertop is too small at eight feet long.

We needed a quick and cheap solution. I purchased five 10 feet long boards at Home Depot and to create a plank style countertop. Pictures and details below.

Happy Holidays!


Here's the "before". I originally created this island using some pre-made cabinets from Home Depot topped with a $98 wood countertop from Ikea. 


Here's the "during". I butted the boards together to create a plank style look. I filled the gaps with wood putty. I would later frame the ends with 1"x3" pine boards.


I needed posts to accommodate the new length. Home Depot used to sell these great island legs for $29 each (I used those originally with my island). I can't find them anywhere. I ended up using two deck posts that I cut from 48" to 35". I really wanted to mimic the imperfections in reclaimed barn wood. I have a ton of stain that I inherited from my Dad sitting in my garage. I was finally able to use it by combining three different colors (Minwax Colonial, Cherry and Mahogany) for the color of this counter top. 

The "after". Not bad for one night after work and $95 in supplies, huh?


Monday, November 26, 2012

It's beginning to look a lot like Christmas


We love the holidays! My husband loves Christmas and lights (a very dangerous combination). 
The husband's newest Christmas toy. This reindeer will be living on our roof until New Years. 
-


We're hosting our family's annual Christmas Eve party. The theme this year is tacky so I decorated our 10 foot tree with dollar store ornaments in bright colors.


I realized that my house is very tacky this year so I took one of our extra trees and gave it a fancy makeover. I trimmed in dark blue and gold to complement my entryway's main colors.  Good for pictures, right?

I snuck in Mr. Pig (he lights up and is dressed as Santa). The entryway was looking a little too serious. Haha. 

Tuesday, November 20, 2012

Faux Sofa Table


I don't want to commit to a sofa table at this time and saw this idea on Pinterest. Rather than cough up a hundred bucks or more on a sofa table, I spent $21 at Home Depot for two L-brackets and a 10 inch wide by 8 foot long birch shelf.


I stained the board using a gel stain in deep mahogany that I had in my garage from another project. While waiting for the stain to dry, I screwed the L-brackets into the wall. I then waited, waited and waited for the stain to dry. After 4 hours, I had a new (faux) sofa table.


This was probably the easiest project I have yet to do on Pinterest. The most difficult part of this experience was waiting for the stain to dry on the shelf (that really tests your patience :-).


Saturday, November 17, 2012

Rainy Day Saturday: Faux Bedframe

Upholstered box spring with legs directly attached. 
I really wanted to remove the dry rot in my deck and replace it with new 2x4s today but it's raining. Rain means all outdoor projects come to a halt and I need to find something else to do. So what did I do today? I decided to spruce up my bed.


I don't have a real bed frame. I have an upholstered headboard that I made last year from a sheet of MDF and a metal bed frame I bought on Overstock.com for $30. I love my headboard but I hate the metal bed frame.


I decided to upgrade the look of my bed by upholstering the box spring and adding legs directly onto the box spring. The legs give the bed height and a more finished look (and definitely more personality than a metal bed frame.

First, I flipped the box spring over. With king beds, the box spring comes in two pieces. I purchased 5 pine boards (6 feet long each and around $3 each) at Home Depot and screwed them onto the back side of the box springs. The boards would not only secure the box springs together but would also provide additional support.

When I upholstered my headboard, I used a panel from Target. Luckily, the panel is a standard basic style they keep all year. I went to Target and purchased another panel for $20. Using my staple gun, I covered the box spring.  


After covering the box spring, I screwed mounting plates into the frame.  The legs would screw directly into the mounting plates. The mounting plates were around $2 each and the legs were $3 each. 


Doesn't it almost look like a real bed frame now? :-)


Wednesday, November 14, 2012

It's 5 o'clock somewhere...

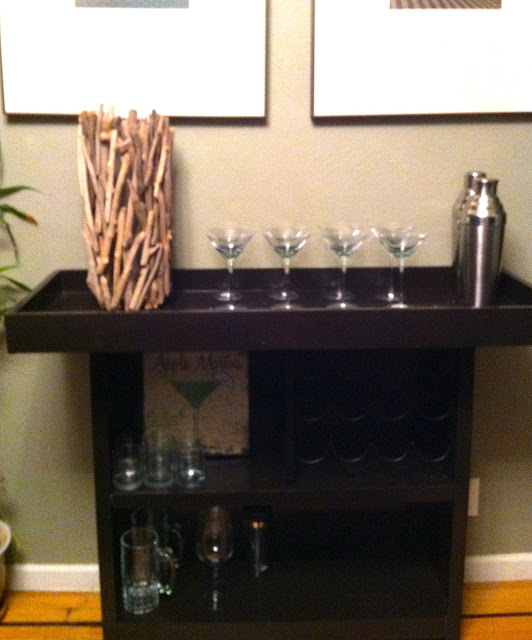
I needed a bar and couldn't find one that I liked or could afford and so I built my own. The project was fairly easy and took one day. I bought the materials from Home Depot and mostly used birch plywood for the bottom shelving and base and a pine board for the top. I spray painted the bar in Dark Walnut (from Rustoleum) and finished with 2 coats of polyurethane for extra protection.


Sunglass Storage!

Another great idea from Pinterest! I took a spare frame and spray it gray and added two rows of picture wire. I finished the project by stapling extra fabric to the back.

Voila! A sunglass holder for my closet. I'll never lose my sunglasses again!


Monday, November 12, 2012

Closet Turned Mudroom

We have a moderately sized entryway closet. The closet had bi-fold doors that were barely on the hinges and the interior made no sense. The inside of the closet consisted of dusty wire shoe racks that barely fit our shoes, shelves that were too narrow to store anything of value and a closet rod that was too low to hold our coats.

My husband is always on the go with a giant gym bag, sneakers and a jacket. He couldn't use the closet and so he ended up storing his gear in our laundry closet or own our kitchen island (both places drove me crazy).

I came up with a storage solution that would make life convenient for him (his gym bag would finally find a permanent home) and less nerve wracking for me (I wouldn't have to twitch when eyeing his work gear on the island or on top of the washer).

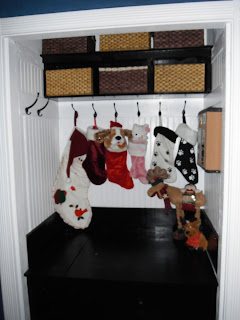
I took off the bi-fold closet doors and gutted the interior. I left the top shelf in there and added one more below it and used extra plywood to make partitions. I then added trim from a prior project and painted the shelves and partitions black so it would look like one built-in piece.

For storage, I built a bench that was 24 inches in height and 45 inches in width.  The top of the bench was on hinges to provide storage space. If needed, we could sit on it to put on our shoes but the bench was deep enough to store my husband's gym bag, laptop bag, and shoes.  Since my husband always comes home with dirty clothes (he's a personal trainer and goes through shorts, socks and gym towels like crazy), I added added a partition in the bench that would devote 15 inches to hamper space.

We have a lot of parties and were never able to use the closet to store our guests' coats and bags (it would get lost in the chaos). To solve this, I added 8 coat hooks. The coat hooks will make it easy for guests to store their belongings during parties and find on their way out. For a finished look, I added white bead board.

Here are some pictures of the finished project.

In progress

Finished! The coat hooks are also great for hanging Christmas stockings. My husband is getting ready for Christmas :-)

Saturday, November 10, 2012

Organized Scarves

I have a rather large scarf collection as I think scarves are a closet staple (along with underwear and socks). Or maybe I am just someone whose neck always gets cold.

My scarves were all over the place. I had some folded in baskets and others randomly hanging off coat hooks. I could never find a storage solution where I could keep my scarves in one place while also displaying them in open view.

I finally resolved this dilemma using extra closet rods from my last project (see my 11/09/2012 post about my latest closet makeover). I cut the closet rods into 22" pieces. I hung six rods in a small nook in the original closet of my new office/closet/ladycave (stay tuned for that posting).

Scarf storage dilemma solved. Not only is this a great space saver but all of my scarves are in open view. No more hunting through random baskets, hooks, hangers and dresser drawers for a certain piece because they are now all on display.

My scarves are now easy to find and easy to view.

Thursday, November 8, 2012

Outdoor Movie Night

A very generous client of my husband's gifted us with a projector. We already have a large television in the house and wondered what we could do with it. We decided on an outdoor movie night.

What's needed for outdoor movie night? First, one needs an outdoor movie screen.

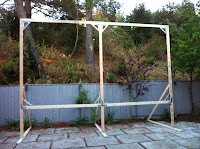
If you go on eBay, you'll find a variety of outdoor movie screens from inflatable to metal frames. These were all out of my price range (an inflatable screen around 10x20" was $3,000!). I decided that I would build my own for $250. I searched online and found a website that sells raw projector material (this means that the ends are not finished and taped off with a border) for a very low price. I bought a 9X16" screen for only $89.50. For the frame, I decided to build it from 2x4's from Home Depot. I bought the lumber in 12" (this made the drive home very interesting). I spent around $140 on paint, lumber, screws and corner brackets.


I'm only 5'1 and even on a 10 foot ladder, I couldn't reach the top of the frame to staple the screen on. Instead, I built the frame for the screen separately. I stretched the material on it and used my upholstery-grade stapler to secure it to the wood.


 I'm lucky my husband works out. With his help, we secured the screen frame to the main frame with 3 inch screws.


 Now that we had the movie screen up, we needed to have a sign. Why? Because all movies need a lit sign!


Using poster board, spray paint and Christmas lights, we now had a movie sign complete with lit-up arrow.


                                      Every movie night needs a concession stand.  


 We had to keep the bright lights off in the backyard so they wouldn't interfere with the projector. My husband strung extra Christmas lights in clear with some battery operated lanterns.  


 Spaceballs in my backyard. An eighties classic! 

Closet 2.0

Goodbye Closet 1.0

Due to my large wardrobe (or clothes hoarding as my husband likes to call it), I turned a spare bedroom into a closet. I went to Home Depot and bought a can of blue paint and laminate shelves. In one day, I had a walk-in closet. I loved it and had room to spare. However, after a while, I realized that the closet had a lot more potential for space and function.


Hello Closet 2.0

I took down all of the laminate shelves and brackets and repainted the room white. This project definitely took more than one day.
I repurposed the laminate shelves from Closet 1.0 and used it for the shoe wall. I also installed vintage school locker hooks to hang my "slouchy" purses. 

I always hang my boots. I think boots are easier to organize and display when hung. I got these great hanger clips called "Clever Clips" from Amazon.com for around $12 per pack of four. 


Rather than just hang random closet rods on the walls, I decided to take the closet one step further and build boxes to  hang my clothes from. Not only does this give the closet a more finished look but these definitely save on space. I was able to hang 3 closet rods in one box. I also had specific boxes for different styles of clothes (dresses and work tops in one box, outerwear and jeans in another).


Thanks to the new layout of my closet, I had so much extra room. I work from home and decided to build in an office space in my closet. I used an extra sheet of plywood for the desktop and sandwiched it between my purse shelves. Its so much nicer being surrounded by the ones you love when working :)

The French Bulldog lamp was an awesome surprise from my husband. I think she completes the office space.